
A fellow teacher has commissioned me to make her son's first birthday cake along with is very own smash cake. She has asked for a crown as the topper. Soooo, I figured I could do this right, anyone can create a crown out of gumpaste. First thing I did was to go to Burger King and ask for a crown. I am guessing the kids behind the counter are still talking about that lady that waltzed into the restaurant late one evening and asked for a crown. Must have seemed just a wee bit odd... Anyway, armed with my Burger King Crown I began creating. First I made a photocopy of the crown
 and reduced its size to approximately 80%. Next, I cut the "finials" off the top of the crown. I really don't know what these are called but finials sounds good at the moment. I had decided to make a crown with at least a 4 inch diameter so I played with my reduced crown until I was satisfied with the diameter and cut both ends off to the size I needed.
Below is a picture of the before and after.
 Next I followed the very detailed directions found on Sharon Zambito's Sugar Ed Lagniappe site for creating a gumpaste crown. My crown appeared to be a bit larger then hers so I needed to make some minor adjustments, like finding the right size can, but other than that I followed those directions.
 Anyway after the crown had hardened, I added a 3mm gumpaste bead border around the bottom. I found it added a finished look to my crown. I airbrushed the entire crown with super pearl.

Next I cut out several flourishes using cutters I purchased from Sharon's store, painted those with old gold luster dust and adhered to the crown using melted chocolate.
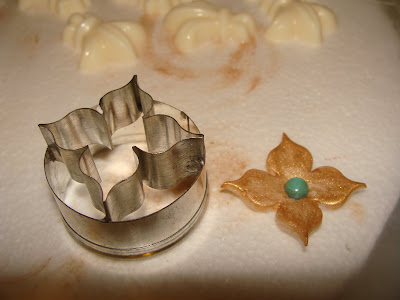
The Fleur de Lis was made by pressing fondant into a chocolate mold that had been dusted with cornstarch to make the piece release easier.

The small aqua jewels in the center of the gold clover were made by dropping droplets of poured sugar onto wax paper and letting them harden (recipe at the end).

Poured Sugar Recipe:
1/2 cup of granulated sugar
1/8 cup of light corn syrup
1 tablespoon of water
In a one cup glass measuring cup, combine all ingredients -- Microwave on high for 2.5 minute or to hard crack stage --
WARNING -- MIXTURE is extremely hot and will cause severe burns
Pour into candy molds that are made for high heat or allow droplets to drop onto was paper and allow to harden.


 This next cake was designed for a 13 year old girl who loves horses. I used a picture of a horse from her decorations to cut out the horse on top. The fence was cut using the Paper Dolls Cartridge and Happy Birthday Deborah was cut using the Base Camp Cartridge. The sunflowers were cut using a daisy cutter .
